
Building a license key activation system with Next.js, Supabase and Stripe
Introduction
My two most recent products are desktop applications: users download them for free, try them out in limited form, and then hopefully decide they like them enough to pay for the full, unrestricted version. But what does this payment flow look like, and how does it get them access to the full version of the software? What happens if they change their mind and want a refund? How do we make sure one person can't pay for the software and then share it with other people?
These aren't new questions, and one answer to them is to use some sort of license key activation system. That's exactly what I decided to do with supasight and stackman. I've simplified the licensing code and open sourced it over at @makeusabrew/lockbase, and I'll talk through some of the design choices and implementation details in this article.
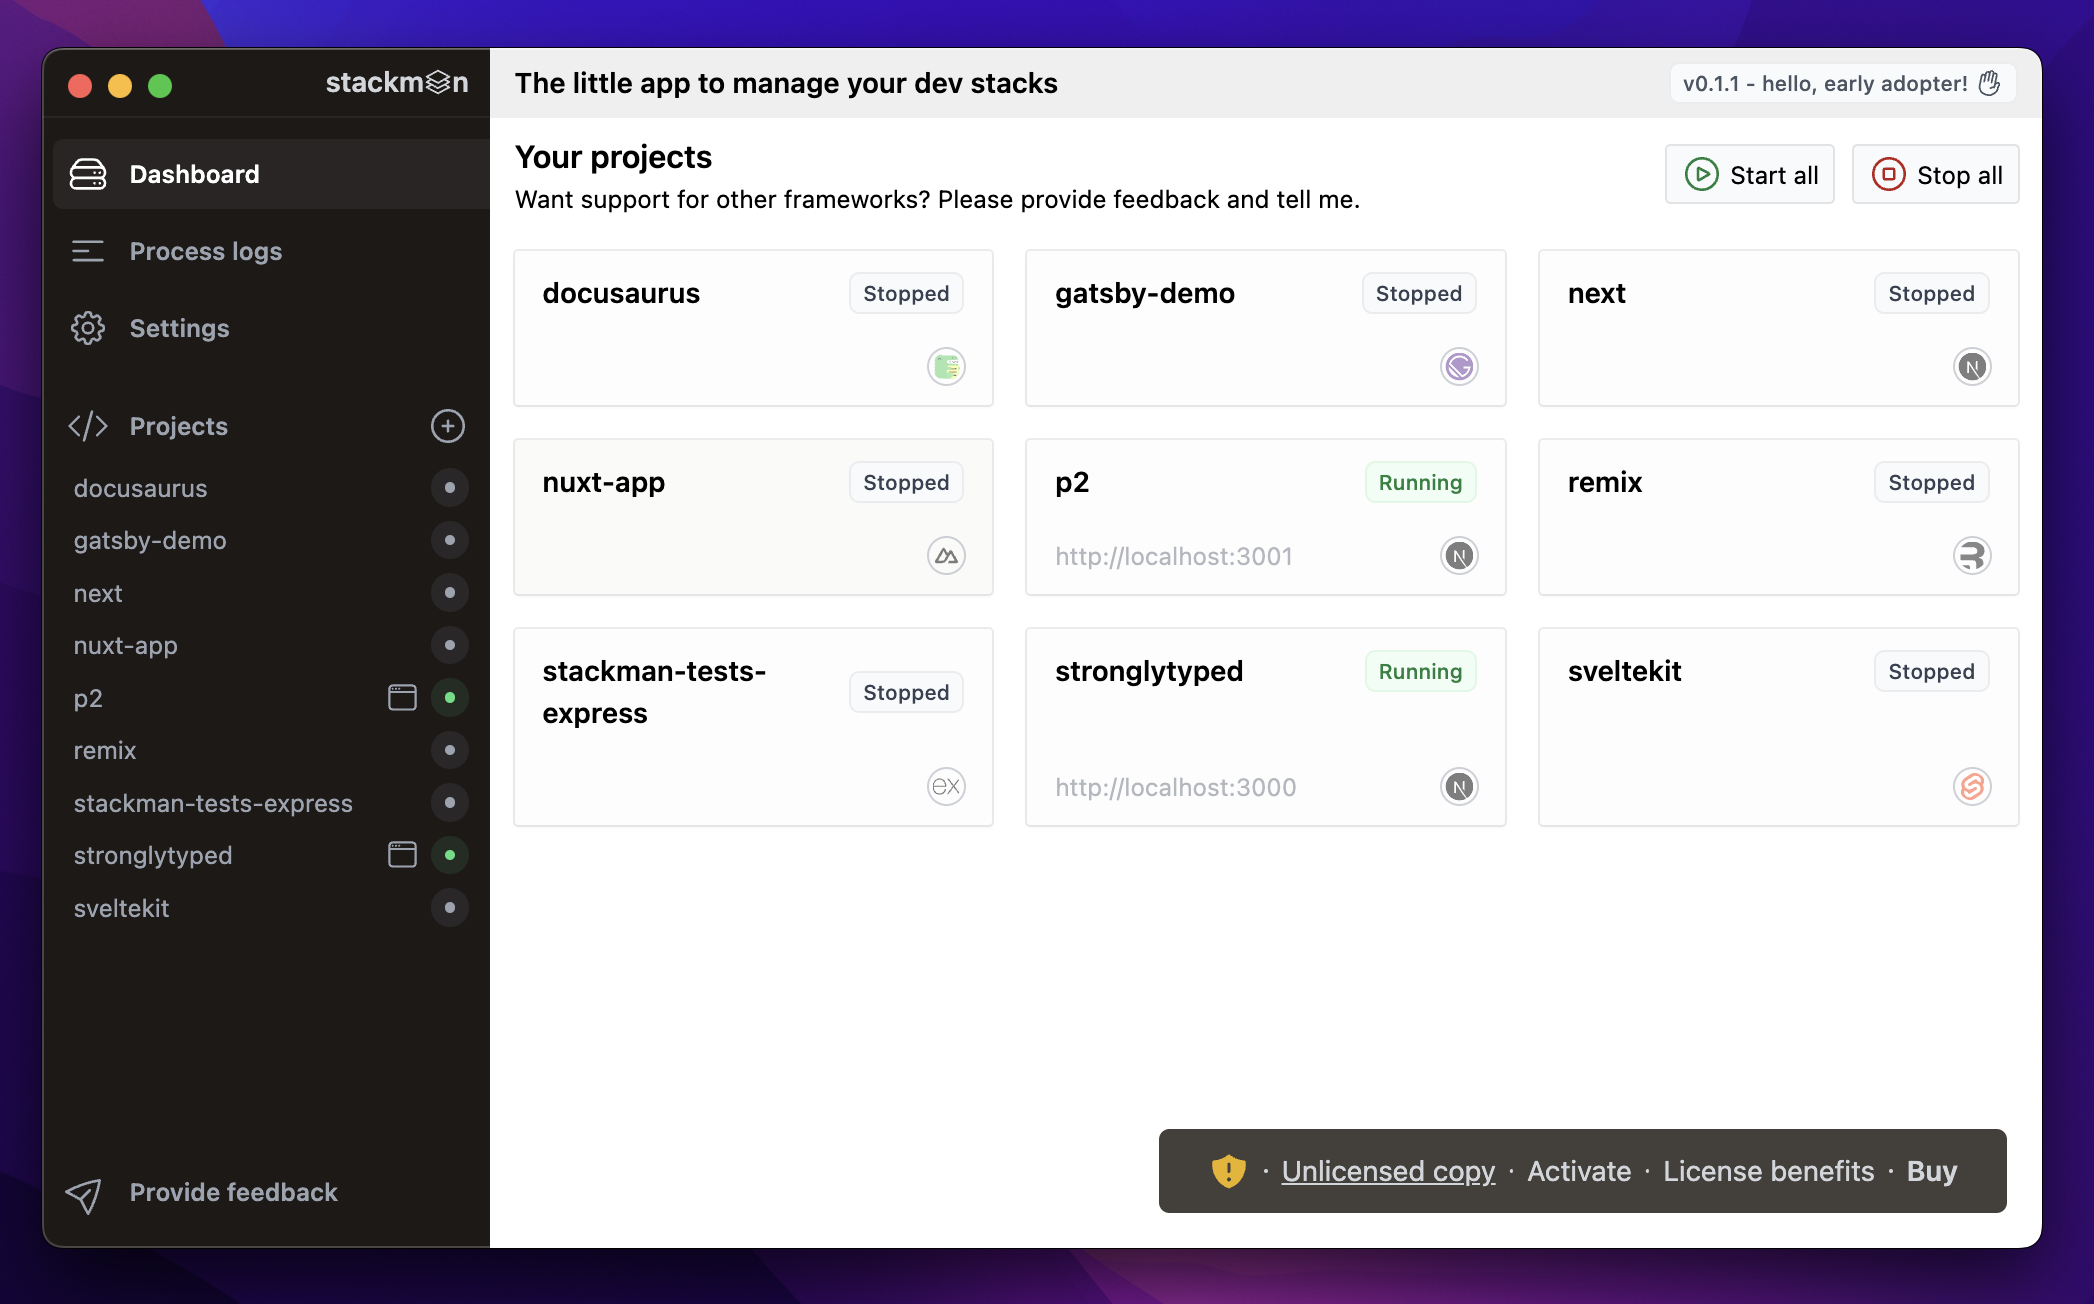 An unlicensed version of stackman. I promise I paid for it later...
License key validation approaches
There are two popular approaches to issuing and validating license keys:
- Offline validation: use cryptography to verify the authenticity of a given key, which may embed specific information inside the key (user details, product details, expiry details, etc) that can be decrypted and verified locally.
- Online validation: use a server to validate each key against a database or some other external source. In this scenario the key doesn't need to be cryptographically secure, since the validation is managed server side.
My strengths do not lie in the world of cryptography, so I chose the latter. It has its downsides like requiring an internet connection to validate keys and the associated infrastructure to support that process, but it's much easier to implement. It also has one big advantage: it's easy to revoke keys if a user wants a refund.
API design
I follow Lemon Squeezy on X and through feed osmosis had noticed they offered a first class licensing solution - which, if you ask me, is a really cool feature to offer your customers. I use Stripe for all my payment processing and wasn't ready to jump ship just for one feature, but I did shamelessly plunder their License API documentation to help inform my own design. I very much wanted each key to have an activation limit, and liked their approach of returning a server-generated instance ID upon activation, which is then needed alongside the license key itself for validation.
Ultimately, I settled on just two endpoints to be exposed by Next.js, which would act as an API layer in front of Supabase which would store the license keys themselves. I need to stress that as with all my builds this year, the initial focus was on getting something working which did the job and nothing more. With that excuse out of the way, here's what the API looked like:
POST /licenses/activatePOST /licenses/validate
You might notice some glaring omissions here: how do we actually create a license key? And where's the endpoint to revoke one in the event of a refund? In reverse order: refunds are easy enough and infrequent enough to simply hand-crank via the Supabase dashboard for now, and license creation doesn't have an API layer because it's a privileged operation which is tightly coupled to the Stripe web payment flow. The other endpoints are designed to be called from out in the wild on end-user machines, but license creation isn't. It absolutely could be an API endpoint, but I haven't needed it to be yet. I'll cover how it works later on.
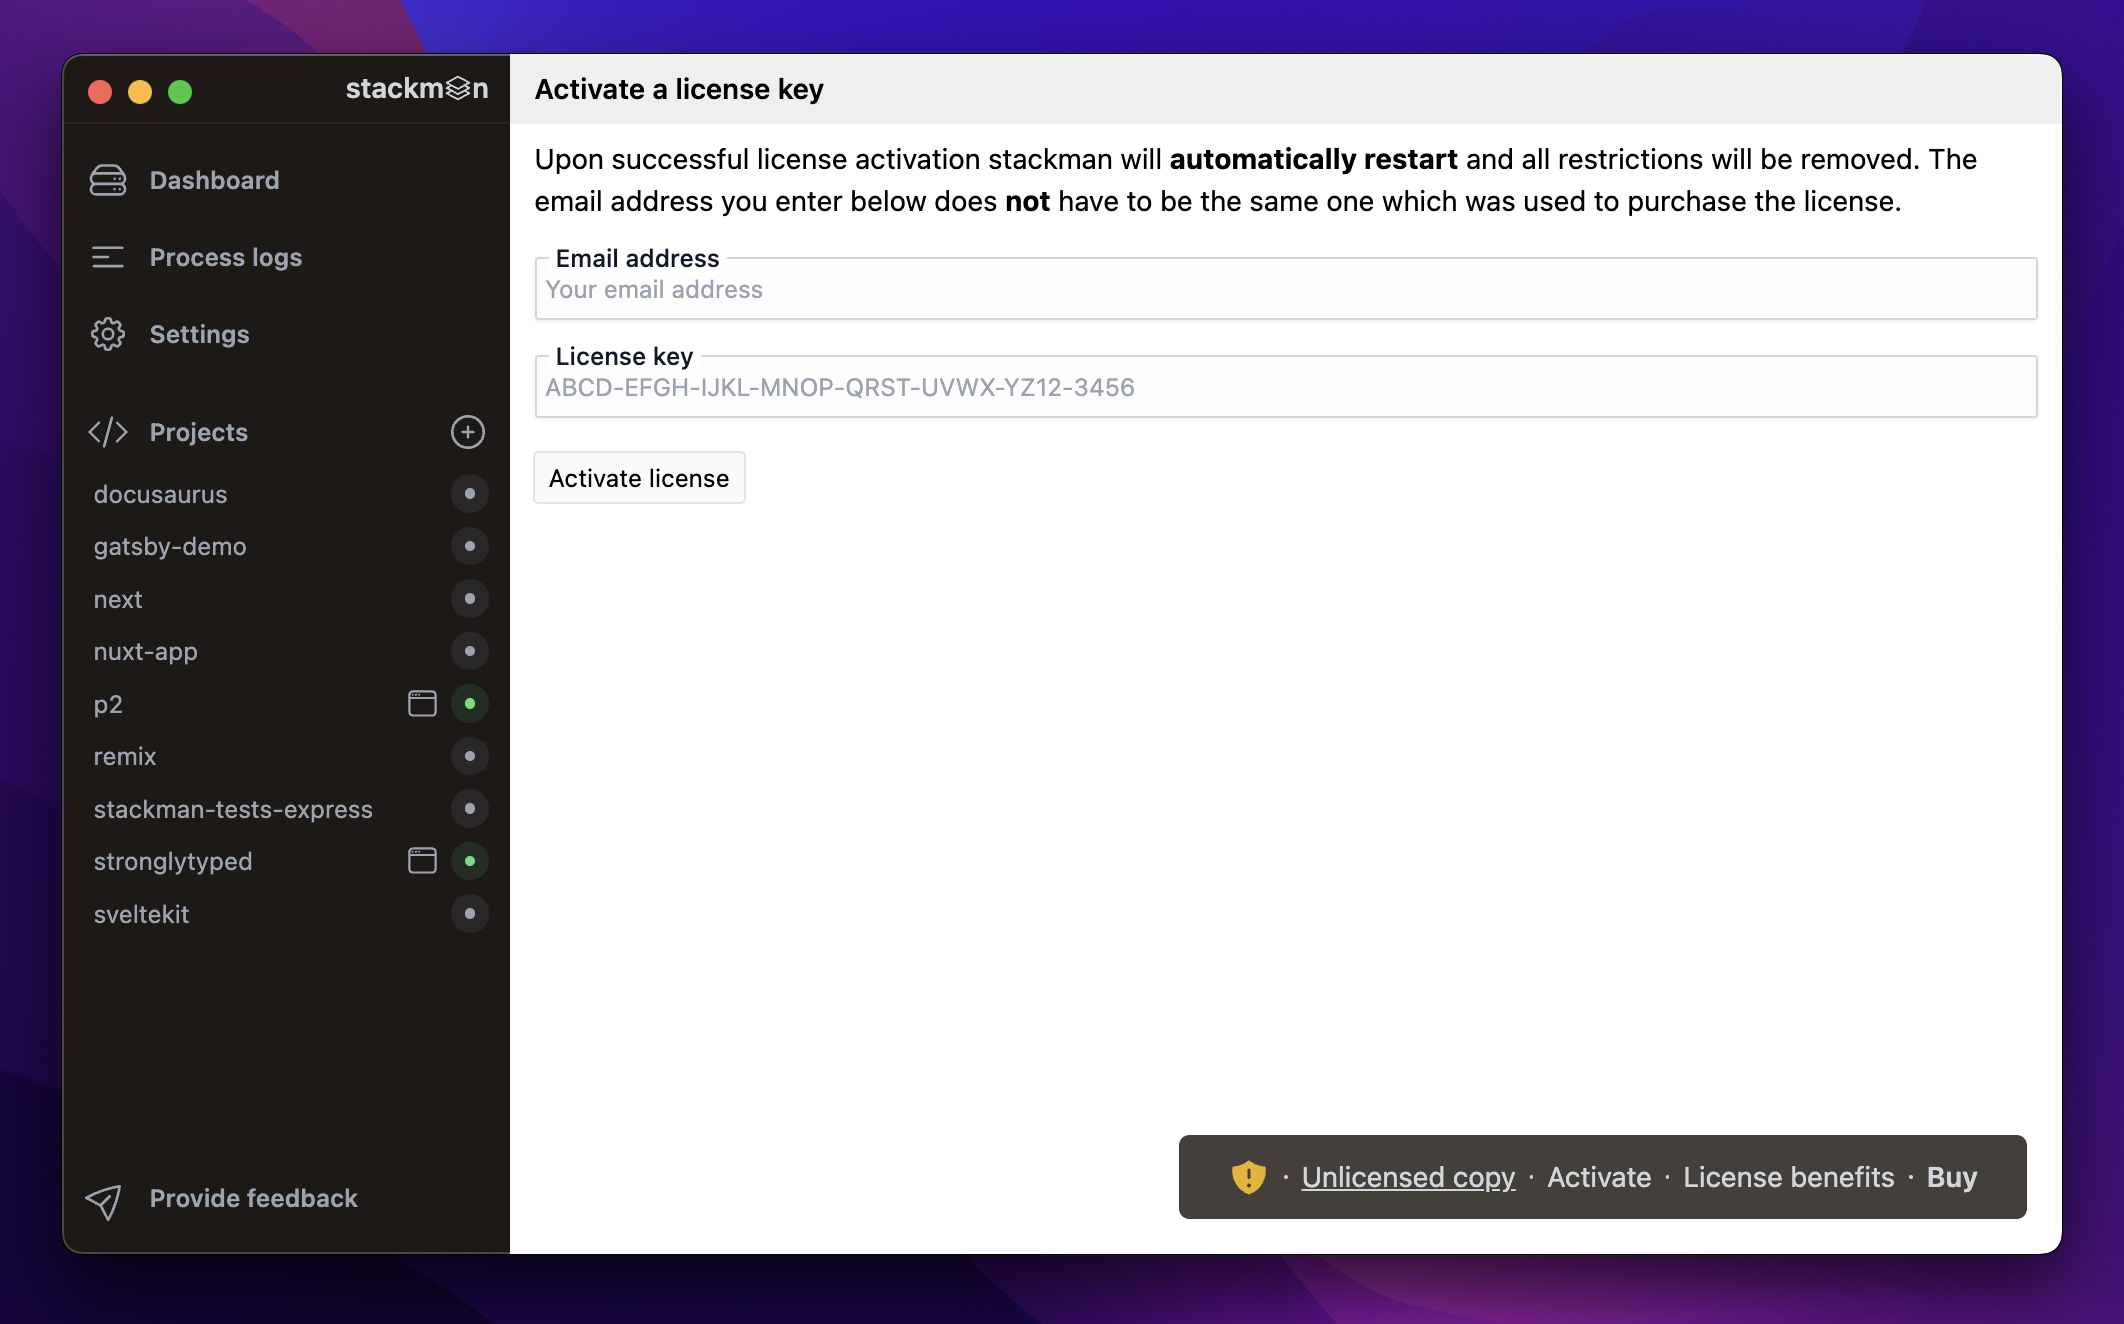
/licenses/activate
Designed to be called when a user wants to activate a license they've just bought. Accepts a simple payload like this:
{
  "licenseKey": "ABC-123",
  "label": "user@email.com"
}
The label can be anything you like: you can let a user set it (e.g. ask them to enter their email address), or you can set it programatically. It's just metadata stored alongside the activation record.
On success, returns a 200 OK and a payload like this:
{
  "instanceID": "INS-456"
}
Here's what the activation screen looks like in stackman:
/licenses/validate
Designed to be called relatively frequently - in my case when the user starts the application. Accepts a payload like this:
{
  "licenseKey": "ABC-123",
  "instanceID": "INS-456"
}
On success, returns a 200 OK and a payload like this:
{
  "valid": true,
  "supported": true
}
The supported field isn't strictly necessary, but I use it to determine whether a license is still within its
support period: licenses are valid forever, but only supported for a fixed amount of time (usually a year after purchase).
It might mean something different for you, or you might choose to omit it altogether.
Key design
By 'design' here I largely mean aesthetic appearance rather than cryptographic integrity. That said, it pays to have a sufficiently large keyspace to avoid collisions and reduce the chances of someone guessing a valid key. For reasons which will become clear in a minute, I settled on v4 UUIDs for license keys and instance identifiers.
The only problem with these aesthetics is that UUIDs don't look particularly license-key-ish.
Here's one I just generated: 8e3cee59-8ff6-4343-9202-581dba8a9ccd. The whole thing has a distinct
lack of visual rhythm to it: the hyphens are all over the place and the differing character heights
are equally jarring.
Luckily, we've got an even number of characters to play with
which can be distributed into equal parts and uppercased for uniformity, yielding something like 8E3C-EE59-8FF6-4343-9202-581D-BA8A-9CCD. That looks a lot more
like a license key if you ask me!
Schema design
In keeping with the minimal approach elsewhere, we only need two tables:
create table public.licenses (
  key uuid not null default gen_random_uuid (),
  created_at timestamp with time zone not null default now(),
  owner_email text null,
  idempotency_key text null,
  support_expires_at timestamp with time zone null,
  status text null,
  seats bigint null,

  constraint idempotency_key_unique unique (idempotency_key),
  constraint licenses_pkey primary key (key)
);

create table public.license_instances (
  id uuid not null default gen_random_uuid (),
  created_at timestamp with time zone not null default now(),
  status text null,
  label text null,
  license_key uuid null,

  constraint license_instances_pkey primary key (id),
  constraint license_instances_license_key foreign key (license_key) references licenses (key) on delete cascade
);
Nothing too scary. A lot of it is metadata: we don't strictly need creation timestamps, statuses or support expiry dates, but in practice you're always going to attach something meaningful to your own licenses, so these are good starting examples. Licenses are the actual keys themselves and hold information such as the number of permitted seats (the activation limit), while instances are redemptions of those licenses tied to a single user, computer, or some other entity.
The use of UUIDs for keys and instance IDs should now make sense: we can simply lean back and let Supabase and Postgres generate them for us on insert with the gen_random_uuid() function. We'll see how that works in practice shortly.
API implementation
The full code for this is available on GitHub, so I'm going to leave out some of it out and remove some error handling to keep the code short. First up, the activation endpoint:
License activation
/* imports ... */
export async function POST(request: Request) {
  const { licenseKey, label } = await request.json()

  const client = createAdminClient()

  const formattedKey = keyToUuid(licenseKey)
  const { data, error } = await client
    .from('licenses')
    .select('key, seats, license_instances(*)')
    .eq('key', formattedKey)
    .eq('status', 'active')
    .maybeSingle()

  if (error || !data) {
    console.log(`Could not retrieve license key ${formattedKey}`)
    return NextResponse.json({ instanceID: null }, { status: 404 })
  }

  const activations = data.license_instances as any[]

  if (activations.length >= (data.seats ?? 0)) {
    return NextResponse.json({ instanceID: null }, { status: 400 })
  }

  const { data: instance, error: instanceError } = await client
    .from('license_instances')
    .insert({
      license_key: data.key,
      label,
      status: 'active',
    })
    .select()

  if (instanceError || !instance || instance.length === 0) {
    console.error(`Could not activate license: ${instanceError?.message}`)
    return NextResponse.json({ instanceID: null }, { status: 500 })
  }

  return NextResponse.json({
    instanceID: instance[0].id,
  })
}
There isn't too much going on here: normalize the incoming key to the expected UUID format, check if a license exists and hasn't already reached its activation limit, create a new instance record and return its ID. Voila - license activation!
License validation
License validation is even more straightforward:
/* imports ... */
export async function POST(request: Request) {
  const { licenseKey, instanceID } = await request.json()

  const { data } = await getSupabaseAdmin()
    .from("licenses")
    .select("*, license_instances(*)")
    .eq("id", keyToUuid(licenseKey))
    .filter("license_instances.id", "eq", instanceID)
    .maybeSingle()

  if (!data) {
    console.log(`No matching license for key ${licenseKey} and instance ${instanceID}`)
    return NextResponse.json({
      valid: false,
    })
  }

  return NextResponse.json({
    valid: data.status === "active",
    supported: data.support_expires_at ? new Date(data.support_expires_at) > new Date() : false,
  })
}
The logic at the end to determine if the license is still within its support period is just an example: again, you may or may not follow suit, and you might want to return more fields in your response. With that, the API needed to activate and subsequently validate licenses from our desktop applications is complete. Not bad for two database tables and a few lines of code!
Caveats
You may have spotted that this implementation potentially allows a user to activate a license key once and share the instance ID they get back with other people, circumventing the activation limit: there's nothing that ties an instance ID to a person or a computer. Whether or not and how you want to mitigate this depends on lots of factors. In my case:
- The calling application is trusted (then again, I wrote it, so maybe it shouldn't be)
- The application doesn't ever log the instance ID
- The application encrypts the instance ID on disk using the user's keychain (so it can't just be copied to another computer)
- All requests through the Next.js API layer are logged by my hosting provider (Vercel) so if I really want to I can see how often an instance ID is being used and from where
These aren't going to stop a really determined attacker. If I start seeing lots of requests for the same key/instance pair, I'll do something about it.
License creation
I mentioned earlier that creating a license
is tightly coupled to actually paying for it, which is my excuse for so far not API-ifying it. Due to this coupling, it makes sense
instead to look at the payment flow as a whole rather than just the act of creating a license (which boils down to a fairly simple INSERT).
Checkout flow: paying for a license
One way or another, license payment is initiated via a web browser: either the user stumbles across supasight.co or stackman.app directly, or a 'Buy' button within the respective application opens a link in their web browser to the stackman or supasight home page. Lockbase uses the App Router introduced in Next.js 13.x, and leans on a couple of new features to demonstrate one way of implementing a checkout flow:
- Server Actions: to initiate the Stripe checkout session
- React Server Components: to create and display a license key to a user after successful payment
Server Actions
In certain situations server actions allow you to do away with creating an API route and wiring up the routing between your client code and API layer. The simplest way to use them is the one demonstrated in Lockbase:
import { stripe } from '@/lib/admin/stripe'
import { headers } from 'next/headers'
import { redirect } from 'next/navigation'

const createCheckoutSession = async () => {
  'use server'
  const siteUrl = headers().get('origin')
  const session = await stripe.checkout.sessions.create({
    mode: 'payment',
    line_items: [
      {
        price: process.env.STRIPE_PRICE_ID,
        quantity: 1,
      },
    ],
    success_url: `${siteUrl}/payment?session_id={CHECKOUT_SESSION_ID}`,
    cancel_url: `${siteUrl}/`,
  })
  redirect(session.url!)
}

export default function BuyButton() {
  return (
    <form action={createCheckoutSession}>
      <button type="submit" className="bg-indigo-600 rounded-md ring-1 ring-indigo-500 text-white px-3 py-2">
        Buy now!
      </button>
    </form>
  )
}
If you're not familiar with Server Actions I strongly encourage taking a look at the link above, but the crucial thing to recognise
is that all of the code in createCheckoutSession is executed server side: it is never leaked to or rendered on the client.
The component itself - which just renders a simple button - can be imported into a page just like any other. Here's the incredibly basic lockbase demo page:
import BuyButton from "./payment/BuyButton"

export default function Home() {
  return (
    <main className="mx-auto max-w-5xl p-10">
      <h1 className="text-2xl font-semibold mb-10">Lockbase demo: purchase a license</h1>
      <BuyButton />
    </main>
  )
}
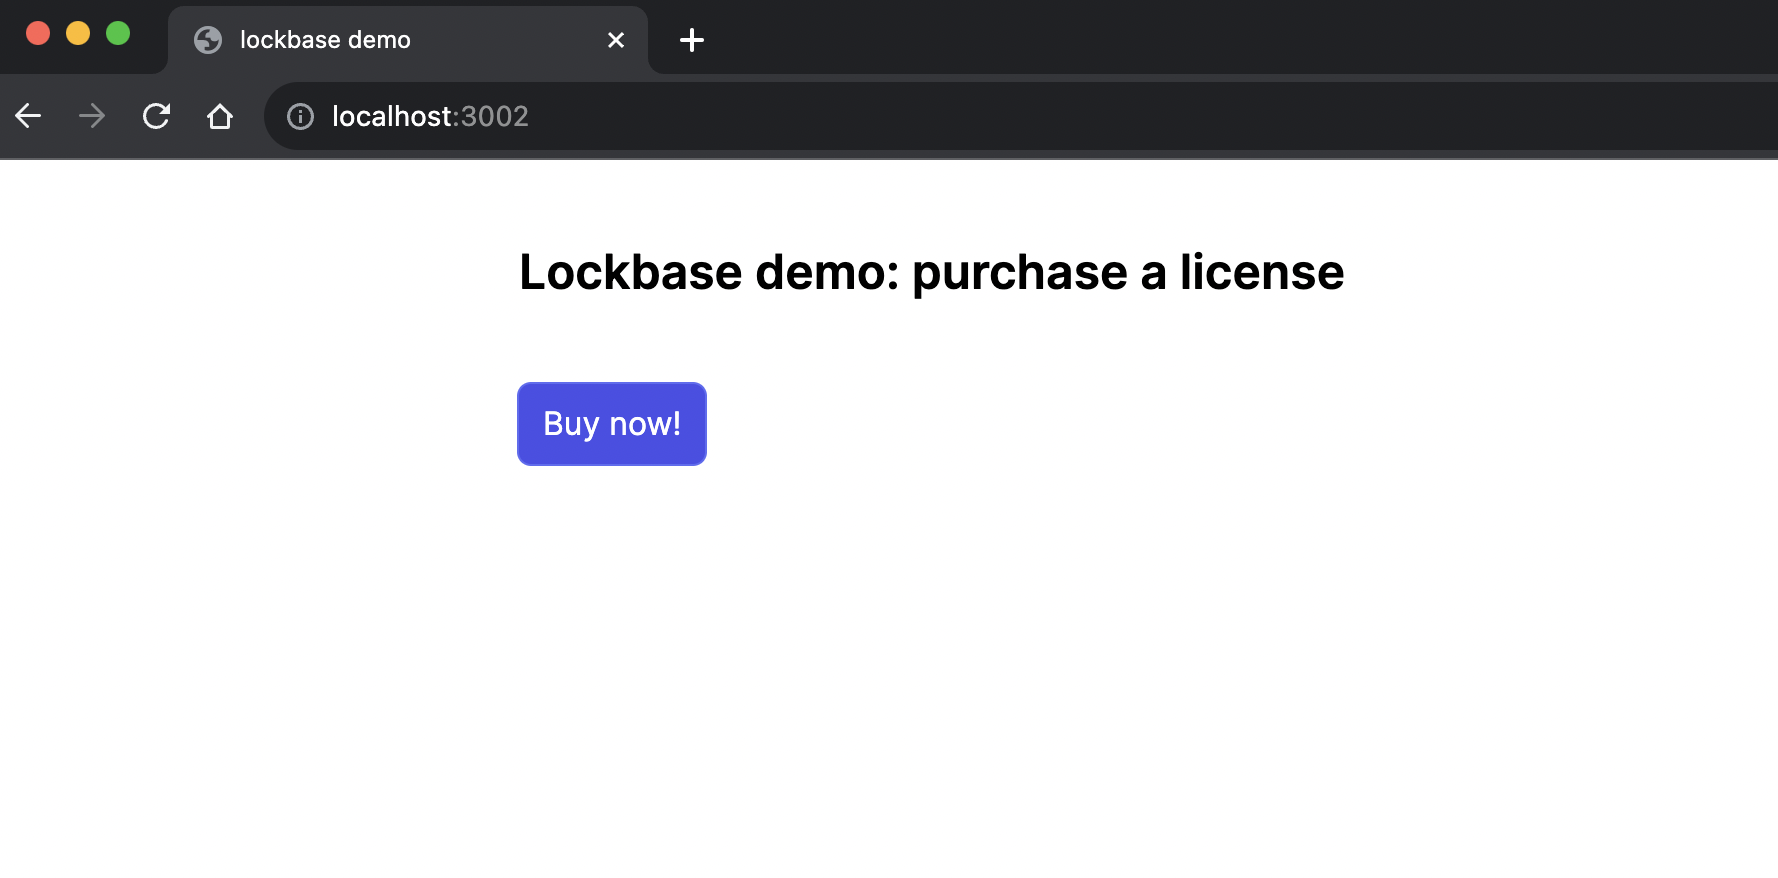
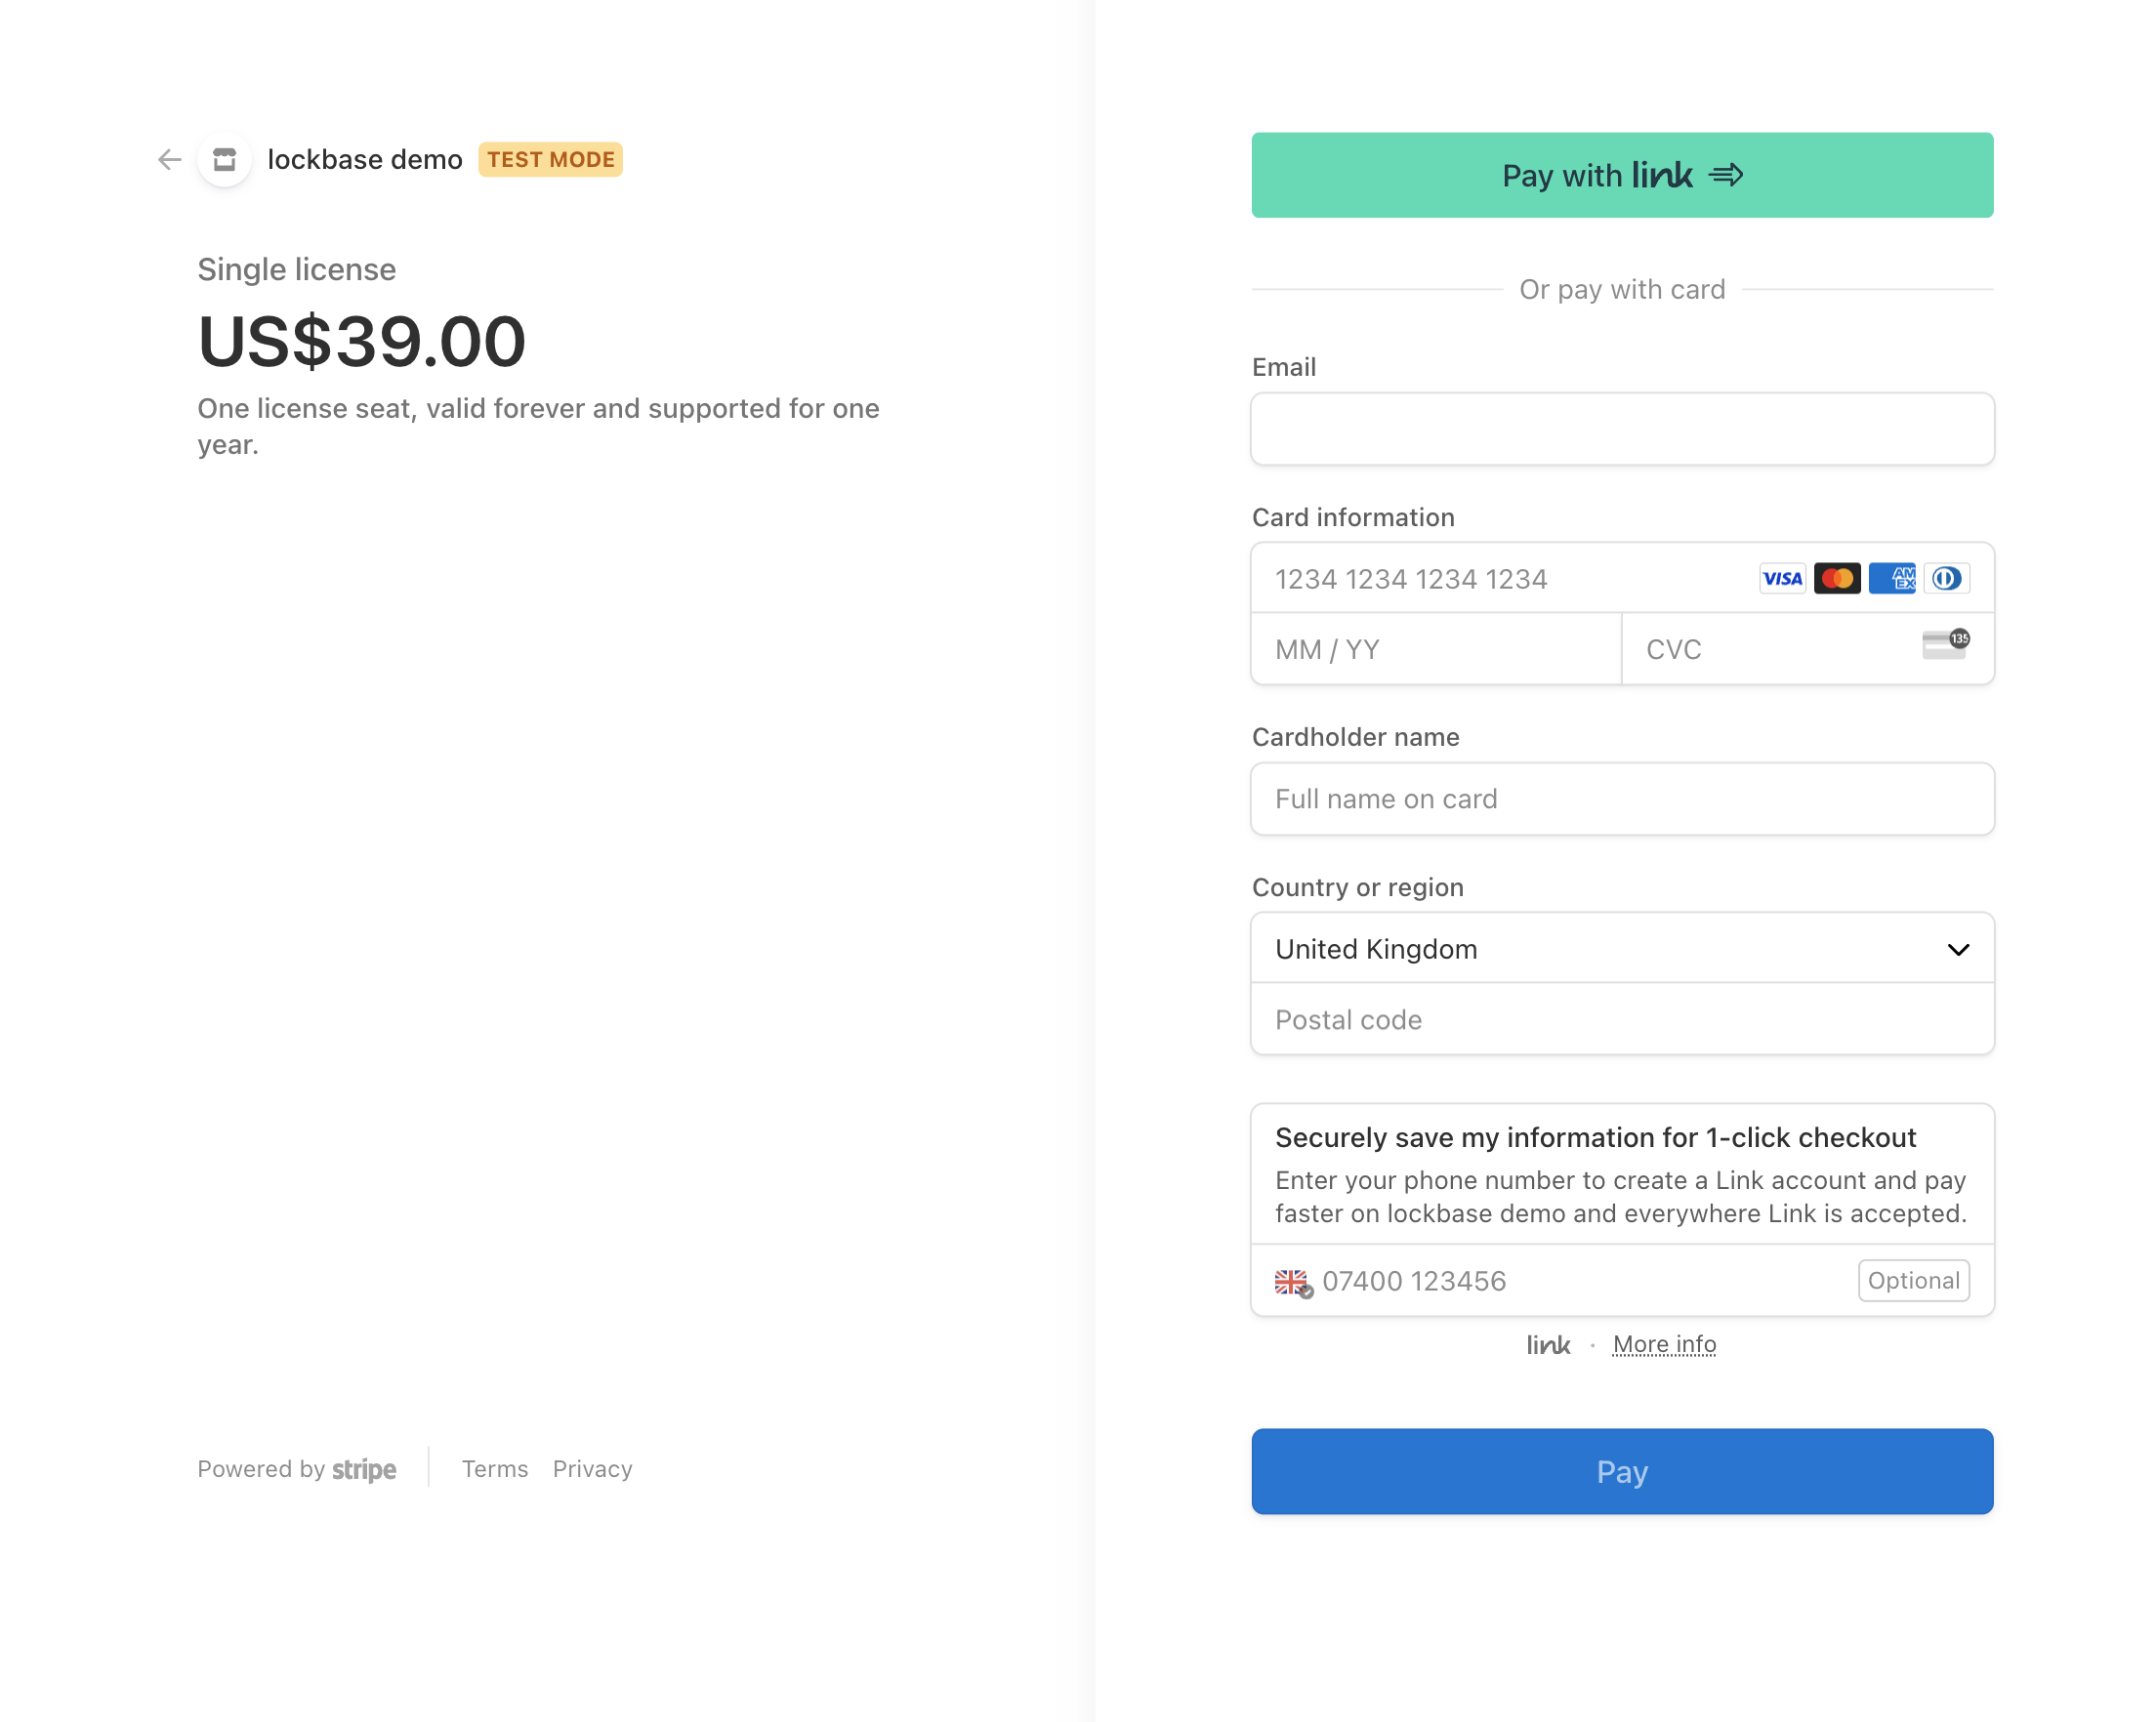
This is absolutely no frills: no animations or loading states when the button is clicked, but it gets the job done and kicks off the checkout flow, resulting in the user being redirected to a Stripe checkout page.
React Server Components
Assuming the user completes the checkout flow they'll end up back on your site at the success_url specified in the server action;
in this case, /payment?sessionId={STRIPE_SESSION_ID}. STRIPE_SESSION_ID is a placeholder which Stripe will replace at runtime
with the actual checkout session ID, meaning we can look it up in the page which handles this route.
If the checkout is complete and paid up, we can idempotently create a new license:
import { stripe } from '@/lib/admin/stripe'
import { createAdminClient } from '@/lib/admin/supabase-admin'
import { uuidToKey } from '@/lib/format-key'
import { addYears } from 'date-fns'
const getOrCreateLicense = async (sessionId: string) => {
const sbAdmin = createAdminClient()
const checkout = await stripe.checkout.sessions.retrieve(sessionId)
if (checkout.payment_status !== 'paid' || checkout.status !== 'complete') {
return null
}
// the unique constraint on `idempotency_key` means this will only ever succeed once:
// if you get `data` back, it's a new license - you might care about that. This demo doesn't.
const { data, error } = await sbAdmin
.from('licenses')
.insert({
idempotency_key: checkout.id,
owner_email: checkout.customer_details?.email,
// result.created is seconds since epoch hence the upscale here
support_expires_at: addYears(new Date(checkout.created * 1000), 1).toISOString(),
status: 'active',
seats: 1,
})
.select()
// regardless of the result above, always retrieve the license details
const { data: licenseData } = await sbAdmin
.from('licenses')
.select('key, owner_email')
.eq('idempotency_key', checkout.id)
.single()
return licenseData
}
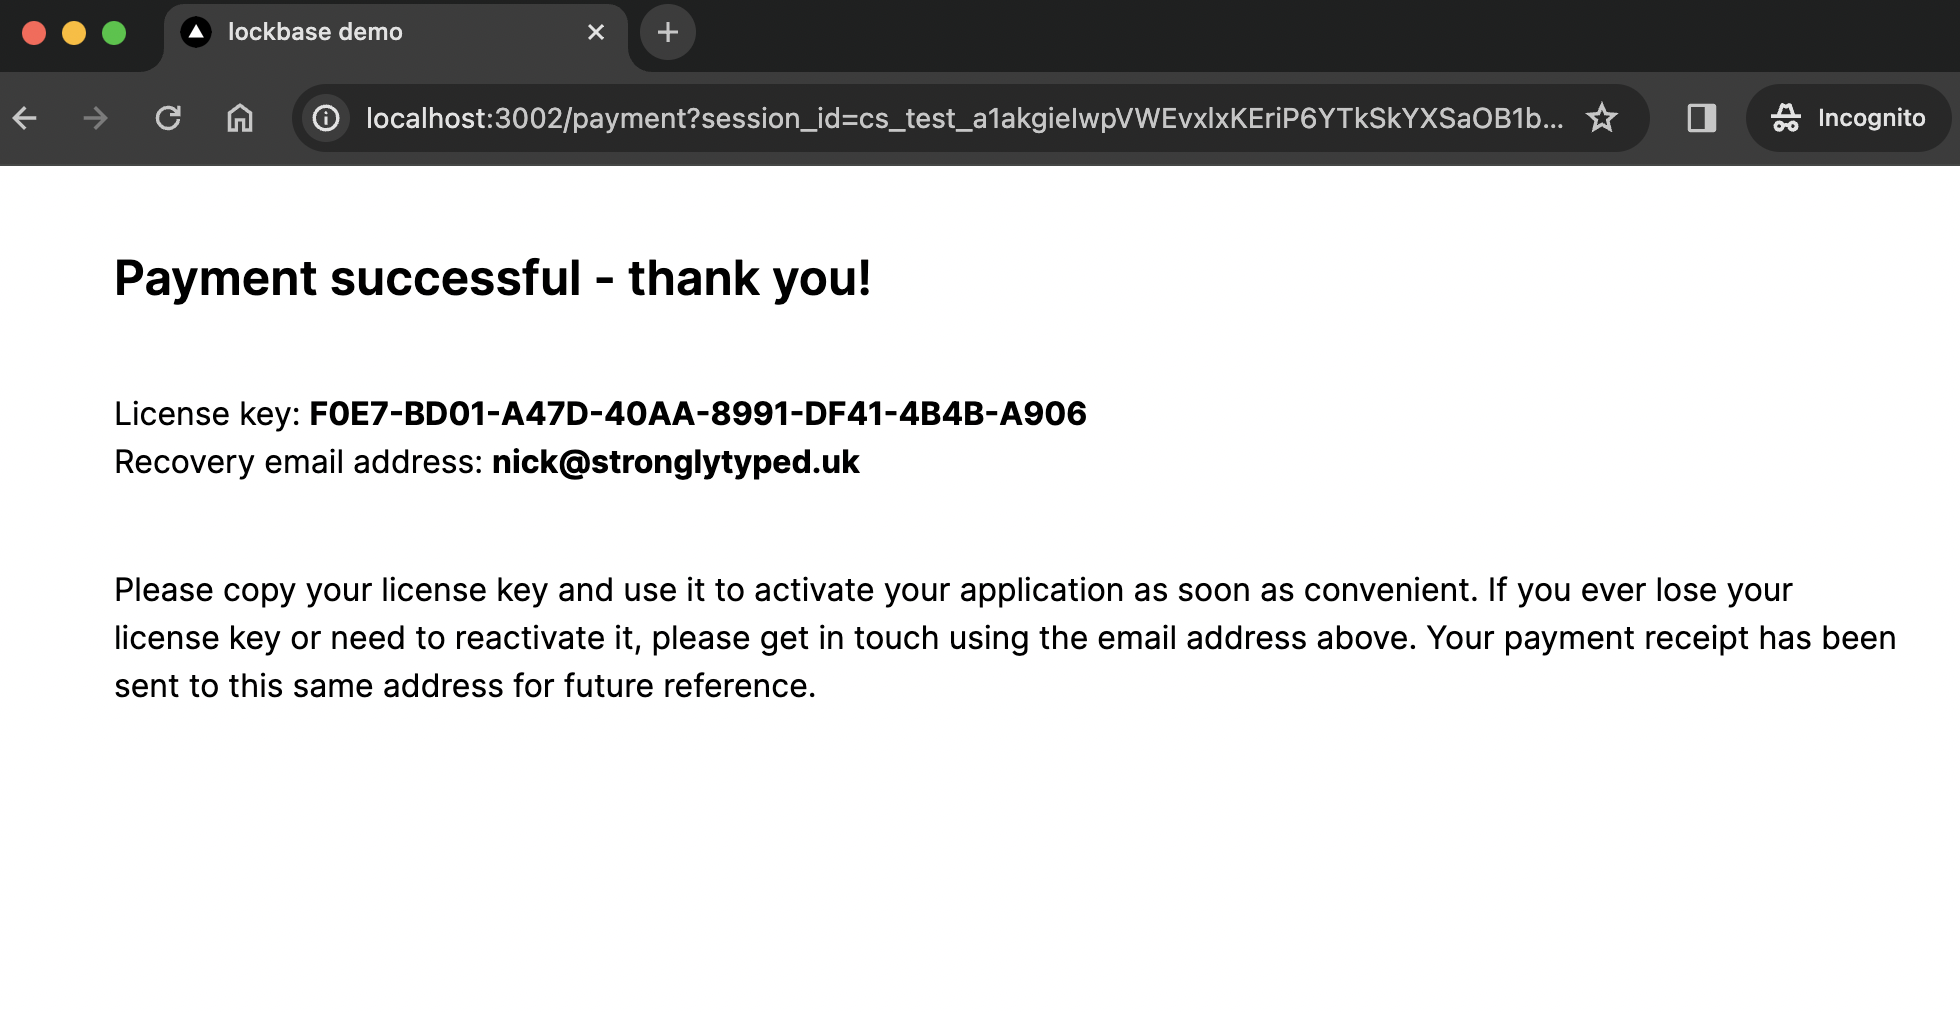
export default async function PaymentPage({ searchParams }: { searchParams: { session_id: string } }) {
const details = await getOrCreateLicense(searchParams.session_id)
if (!details) {
return (
<div className="mx-auto mt-10 max-w-4xl">
<h1 className="mb-10 text-2xl font-semibold">Payment failed</h1>
<p>
Your payment was not successful. You have <b>not</b> been charged and you have <b>not</b> been issued with a
license key.
</p>
</div>
)
}
return (
<div className="mx-auto mt-10 max-w-4xl">
<h1 className="mb-10 text-2xl font-semibold">Payment successful - thank you!</h1>
<p>
License key: <b>{uuidToKey(details.key)}</b>
</p>
<p>
Recovery email address: <b>{details.owner_email}</b>
</p>
</div>
)
}
Much like the earlier server action example, it's vital to understand that this code executes server side: only the resulting
HTML is sent to the client.
I'm using the Stripe checkout ID as the idempotency key
(side note: I had no idea there was an RFC on a standardised Itempotency-Key HTTP header!)
to ensure that a license key is only created once per payment, even if a user refreshes the page or navigates back to it after
some time. I'm also storing the email address they entered during checkout against their license in the event they lose their key
and need to recover it later. Again, you might see some metadata you don't care about or want to change: perhaps you'd vary
the seats based on the amount the user paid for the license, or give them more support time if they paid for it.
A note on security
The /payment route is not protected, so as it stands it exposes a potential attack vector for someone motivated enough:
in theory they could spam it with guesses at a valid sessionId query parameter until they hit one, at which point
the returned HTML will leak a valid license key. Stripe Checkout IDs are vastly complex and the search space to hit a valid one
is enormous, so I've ruled out worrying about this for the time being. Possible quick fixes would be to set a session token before
initiating checkout, or to simply never show the license key and email it to the user istead. As always, these things are
trade offs.
Why not use Stripe webhooks?
Any half-decent Stripe tutorial will encourage you to use webhooks to handle payment events, but this isn't a half-decent Stripe tutorial. This implementation offers a very simple alternative and a nice way to demonstrate the use of React Server Components. It keeps all the code in one place, doesn't require any configuration in Stripe, and "just works" in development without having to expose your local environment to the web so Stripe can call it. I'm not saying it's better, but it's a functional alternative.
Revoking licenses
For now to revoke a license I simply hop into the Supabase dashboard and change a license's status column to something other than
active. The next time an application pings the validation endpoint, it'll receive a valid: false response and can fall back
to the unlicensed version of the software.
Supabase usage
The way Supabase is used in Lockbase is simple: no RLS, no triggers, no functions. We only ever instantiate a privileged admin client (which would bypass any RLS in place anyway). Isn't this bad, or at the very least an anti-pattern? Couldn't the API layer be avoided altogether if we went all-in on some of these concepts? Well, sort of. But if you take a step back, I think the design as it stands has a few upsides:
First of all, putting Supabase behind a server layer reframes it as more of a simple backing store, like a database of old: server runs business logic, database manages state. That's a simple paradigm to develop and reason about, and keeps a very clean boundary between both sides of the API.
Secondly, it makes client integration with the user-facing API a lot simpler: clients can simply call two methods over HTTP. They don't need a Supabase client, they don't need to be bundled with an anon key, and we don't need to fret about whether our RLS setup is correct or not. There is no keeping track of which environment variables are safe to expose vs. those which must be kept private: they are all private, because everything is server side.
Lastly, keeping the business logic behind an API layer allows the implementation to evolve with more flexibility than if too much of the business logic was on the calling side. Remember, the clients in this instance are desktop applications which erodes some control you normally have about those clients running the latest version of your code.
Wrap up
I loved building this: it's a simple system whose flaws I hope I've been honest about, but it got me from zero to licensed on supasight in a matter of hours and was trivial to re-use for stackman. I use a slightly modified version the code which I spun out into lockbase while writing this article, and so far, so good. I've never written a license activation system before, but thanks to a crucial design nudge from Lemon Squeezy and the continued awesomeness of the stack I've settled on this year the implementation was a breeze.